دوست عزیز این ماژول ها مخصوص انتقال دیتاست. برای صوت طراحی نشده.
[h=2]RFM12 - Wireless Transceiver Module Demo[/h]
[h=3]Description[/h]
This project shows how to do wireless communication with the RFM12 tranceiver modue in combination with a PIC microcontroller.
The RFM12 is a low costing ISM band FSK transceiver module. There are different module variants available which support different frequency bands: 315/433/868/915MHZ. The module has an SPI interface for communication with a microcontroller.
For this demo project I used a PIC18F458 and a RFM12 module with 433 MHz. But with some small modifications it will also work for other PIC micros or RFM12 moduls with other frequency bands.
[h=3]Hardware[/h]
The connection of the RFM12 tranceiver module is very simple. It just needs
- a power supply (2.2V - 5.4V)
- a 10k pull-up to Vdd on the FSK/DATA/nFFS pin
- antenna (simple wire with 17 cm length for 433MHz)
- 4 pins for SPI communication (SDI, SDO, SCK, nSEL)
- optinal: one interrupt pin (nIRQ, not used in this demo)

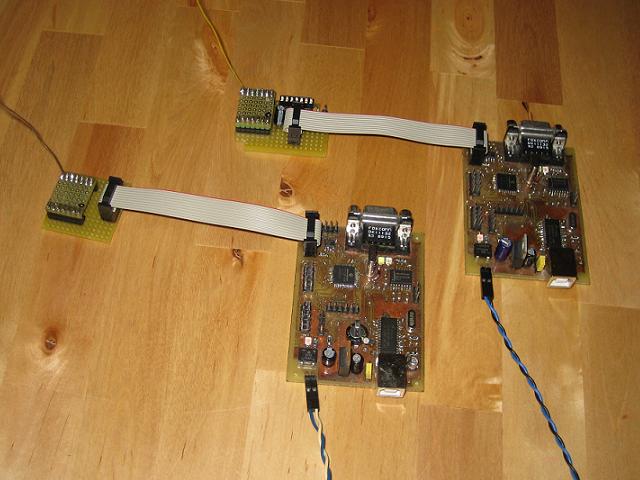
For this demo two microcontroller boards with one RFM12 on each board is required. One acts as transmitter, the other one as receiver.
[h=3]Software[/h]
The driver which is used in this project is mainly based on a RFM12 driver written for an AVR microcontroller (
see link).
I have ported the code to the PIC world. The driver can be compiled with the CCS C compiler and the Microchip C18 compiler.
[h=4]Driver Configuration[/h] If you use the RFM12 driver in your project, you might use another PIC or use different pins for the connection of the RFM12 module. For configuring the driver to your project needs, you need to adapt the driver configuration header file rfm12conf.h.
Here an example configuration for this demo project. For each pin of the RFM12 module which needa to be controlled there is a macro for setting/clearing/reading a pin of the RFM12 module. Depending on your hardware configuration you need to update this file.
Note: As you can see, the configuration of the driver is dependend on the used compiler.
#ifndef _RFM12CONF_H
#define _RFM12CONF_H
/*---------------------------------------------------------------------------*/ /* Configuration for Microchip C18 Compiler */ /*---------------------------------------------------------------------------*/ #
if defined(__18CXX)
#include /* set I/O direction for pins used for controlling RFM12 */ #define RFM12_PinInit() LATD &= 0x1F; TRISD &= 0x1F;
/* I/O pin controll functions */ #define RFM12_ClrSCK() LATDbits.LATD7 = 0
#define RFM12_SetSCK() LATDbits.LATD7 = 1
#define RFM12_ClrSDI() LATDbits.LATD6 = 0
#define RFM12_SetSDI() LATDbits.LATD6 = 1
#define RFM12_ClrNSEL() LATDbits.LATD5 = 0
#define RFM12_SetNSEL() LATDbits.LATD5 = 1
#define RFM12_GetSDO() PORTDbits.RD4
#define RFM12_GetIRQ() PORTDbits.RD3
#endif /* #if defined(__18CXX) */ /*---------------------------------------------------------------------------*/ /* Configuration for CCS C Compiler */ /*---------------------------------------------------------------------------*/ #
if (defined(__PCB__) || defined(__PCH__) || defined(__PCM__))
/* set I/O direction for pins used for controlling RFM12 */ #define RFM12_PinInit()
/* not required for CCS C Compiler */ /* I/O pin controll functions */ #define RFM12_ClrSCK() output_low(PIN_D7)
#define RFM12_SetSCK() output_high(PIN_D7)
#define RFM12_ClrSDI() output_low(PIN_D6)
#define RFM12_SetSDI() output_high(PIN_D6)
#define RFM12_ClrNSEL() output_low(PIN_D5)
#define RFM12_SetNSEL() output_high(PIN_D5)
#define RFM12_GetSDO() input(PIN_D4)
#define RFM12_GetIRQ() input(PIN_D3)
#endif /* (defined(__PCB__) || defined(__PCH__) || defined(__PCM__)) */ #endif /* #define _RFM12CONF_H */ [h=4]Driver Initialization[/h] The usage of the driver is also very simple. During init, the following driver functions need to be called. The parameters can be adjusted to your project needs. For more details regarding the functions check the driver code.
RFM12_Init(); RFM12_SetFreq(RFM12FREQ(433.92));
/* Rx/Tx frequency 433.92MHz */ RFM12_SetBandwidth(4, 1, 4);
/* 200kHz Bandwidth, -6dB LNA gain, */ /* (DRSSI threshold: -79dBm */ RFM12_SetBaud(19200);
/* 19200 baud */ RFM12_SetPower(0, 6);
/* 1mW output power, 120kHz frequency shift */ [h=4]Transmit Data[/h] To transmit data, you just need to call the RFM12_TxData function with the buffer to be transmitted and the buffer length as parameter:
uint8 txbuf[] =
"*** Hello World! RFM12 Demo! ***"; RFM12_TxData(txbuf, sizeof(txbuf); [h=4]Receive Data[/h] To receive data, you just need to call the RFM12_RxData function with the buffer for receiving the data and the number of bytes to be read:
uint8 rxbuf[32]; RFM12_RxData(rxbuf, 32);
[h=3]Running the RFM12 Demo[/h]
To run the demo, just load
download the
demo and open the project with your CCS C compiler or the Microchip C18 compiler. Some adaptions in the compiler project might be necessary due to different path settings.
To compile the receiver, just enable the MODE_RECEIVER #define and disable the MODE_TRANSMITTER #define.
#define MODE_RECEIVER
//#define MODE_TRANSMITTER To compile the transmitter, just disable the MODE_RECEIVER #define and enable the MODE_TRANSMITTER #define.
//#define MODE_RECEIVER #define MODE_TRANSMITTER Here some pictures of the demo hardware.